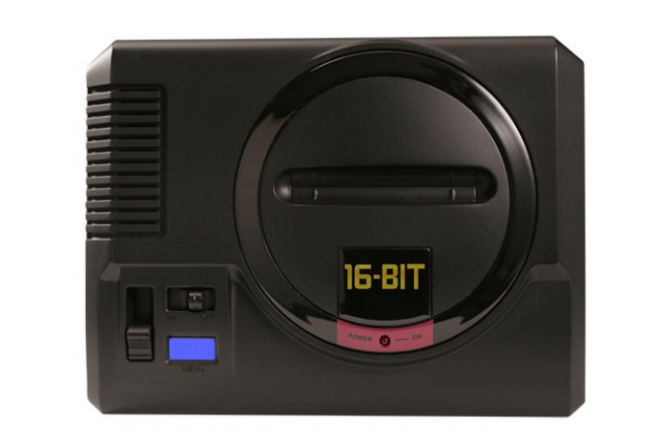


DeathRGH connu sur la scène et qui a largement contribuer au dev d'outils à l’époque de la Xbox 360, se penche maintenant sur PS4 et nous sort son tout dernier outil nommé PlayStation 4 Toolbox.
Adrenaline Bubble Manager v5.00- Added submenu for Extra Setting.- Added hability to inject images to ABM bubbles.Adrenaline Bubble Manager v4.10- Buttons X and O reassigned only when using ABM (only if required).- Fix list sorting, now ABM shows last preset option everytime.- Fix snowfall animation.Adrenaline Bubble Manager v4.09- Support for 3.65 CFW (Thanks to Lecheerman).- Fix automatic network update (Add TLS v1.2 Support).- Updated to the latest version of ONElua.
Changelog 2.80 :- (rev3) Added 4.82 DEX support- (rev2) Reduced memory use- Added ps3 TOOL support (with DEX/CEX kernel only)- Added console finder into consolemanager- Added vsh menu- Added 4.82 CEX support
Aujourd'hui @ignacio1420 nous informe sur Twitter que grâce à @@CelesteBlue123 son thème Rick & Morty PEH est désormais disponible. Il a également mis à jour les menus GTA 5 inclus dans les dernières versions.
Il sera désormais possible de personnaliser le thème pour les exploits.
Un tuto verra bientôt le jour.
Téléchargement : http://ps4-exploit-host Rick et Morty theme.rar (6.82 MB)
Voici l'intégralité du changelog depuis la création du soft :
2.4.2- Fix name2.3- Test version2.2.2- New name file2.2- Add logs- Auto find *.rap for pkg in option "RIF PKG"- New interface- New option - sign pkg- Fix owerwrite param.sfo- Add Checks- Little more2.0- Add new tools: try fix CFW pkg- Cleanup github files (now all in releases)1.9- Add database for create *.rap file. Just put psn *.pkg file same directory, run tools and Make RIF PKG - from act.dat & idps.hex & rap1.8- Python is no longer needed- The function of creating a separate DEBUG package is separated.- The function of creating a separate RETAIL package is separated.- Added a function for generating the RIF and packaging in the Retail package together with the act.dat.- In view of the expansion of the functional, the name of the program changed to "MAKE_DEBUG-RETAIL-RIF_PKG".1.7- All utilities are assembled into one EXE.- Added assembly code for more than two folders.- The batch files of the DEBUG package creation and the signed RETAIL (finalized) are combined into one function.1.6- Rewrite some logic bat file- Added manual for pack manuals dir (if you need it)- Remove *lic.pkg. Now create 2 pkg file with licdir- Remove old_create_packages.bat to OLD dir- Remove ps3xploit_rifgen_edatresign v.2.0 to Alt dir1.5- Added color1.4- Added new category1.3- Added make_pkg.bat (rewrite logic bat file)- Added resign_all.bat
Changelog v6.3
- Added ability to freely adjust the screen size to your desire in both psp and ps1 modes.
- Removed 'Screen Mode' and 'Screen Size' from menu.
- Improved Adrenaline Menu.
If you have already been using Adrenaline and want to quickly update, simply open
Adrenaline.vpk
as zip file and copy all modules fromsce_module
toux0:app/PSPEMUCFW/sce_module
.
Change-log / Official ALL change-log:General system stability improvements to enhance the user's experience, including:- Resolved an issue that caused motion controls to respond incorrectly when playing games that use the feature- Resolved an issue that caused user icons for recommended friends to not display correctly
External Content DownloadersFor the downloaders, There is an initial setup to be done, this involves going to Toolbox Settings and Downloading a resource pkg, its quite simple, download the pkg then reboot. If you don't want to use the content downloaders then you don't need to do this step.@ShaolinAssassin Has done some amazing work adding the other regions demos to Demo Downloader, This is really excellent because it was not something I planned to get back to for a long time if ever tbh.@pink1 Helped me rewrite the original XMBPD theme downloader from scratch and in a much better way, now all themes have icons which is something I wanted to do for a long time, theme type and size are displayed on the XMB too, and we also increased the available theme count to over 1001.Wallpaper downloader: When downloading a wallpaper, when the image loads up in the browser, press triangle, go to File>Save Image>System Storage, then you can go to the photo category to set it as a wallpaper.Note: If you browse thousands of items in one session you will get missing icons, a reboot solves it.Debug Settings TogglerOptions to download CEX and DEX settings files to HDD, and then options to inject which ever files you have downloaded, if you don't already know how to use Debug Settings DO NOT use this item.Auto Switching to DEX Xploit linksIf you use the new Debug settings Xploit from Team PS3 Xploit, and you want to have your Xploit links in the Toolbox auto switch to DEX http links when on DEX XMB, then inject this category_game_tool2.xml = DOWNLOAD , if you don't understand what is meant by this, don't use this feature.
Adrenaline Bubble Manager v5.00- Added submenu for Extra Setting.- Added hability to inject images to ABM bubbles.Adrenaline Bubble Manager v4.10- Buttons X and O reassigned only when using ABM (only if required).- Fix list sorting, now ABM shows last preset option everytime.- Fix snowfall animation.Adrenaline Bubble Manager v4.09- Support for 3.65 CFW (Thanks to Lecheerman).- Fix automatic network update (Add TLS v1.2 Support).- Updated to the latest version of ONElua.
- Compatible with Adrenaline v6.3 thanks to Lman.
- Added npdrmfree enable/disable option to ABM bubble edit screen.
- Added ux0:data/ABM/crc.ini to detect the CRC32 of the skprx modules.
NOTE: With lman plugins update, now every bubble saves its own adrenaline configs if you like to disable adrenaline boot screen you have to do that for every bubble.
RequirementsNotes on PSCI
- u-boot running from either TrustZone takeover or bootrom hax. Neither is provided currently, however Switch-compatible u-boot can be found here
- A properly-formatted SD card. Instructions can be found below in Compiling, Installation and Setup
Notes on debugging
- Nintendo's Horizon OS TrustZone component can provide PSCI calls which work for Linux (given patches provided on the repo). By default, the device tree is configured for Linux running from u-boot packaged in Nintendo's package2, with all PSCI calls being sent to SMC #1 instead of SMC #0.
- Use of other trusted firmwares with PSCI on SMC #0 should be able to remove the need for these patches, however it is untested currently.
Compiling, Installation and Setup
- By default, the right Joy-Con rail is used for UART logging output, with pin 5 being the console's TX, and pin 8 being the console's RX. See here for details.
Installation of u-boot will depend on loading methods used. However once u-boot is installed, the following instructions can be used:
- Make sure your SD card is formatted with MBR partitioning, with the first partition being FAT32/exFAT and a second for ext3/ext4. If ext4 has issues booting, try ext3.
- Download the generic ALARM image here and follow the instructions provided to install the filesystem to the ext3/ext4 filesystem on your SD card. You may need a Linux box to do these steps.
- Clone linux-next using git clone git://git.kernel.org/pub/scm/linux/kernel/git/next/linux-next.git
- cd linux-next && git checkout v4.15
- Apply the provided patches in the repo using git am -3 -k <patch file>
- NVIDIA has microcode required for their host1x/DRM subsystems. This should be compiled into the kernel or initramfs for early screen init.
- Download the linux-firmware package from here
- mkdir extra_firmware
- Copy nvidia/tegra210/vic04_ucode.bin and nvidia/tegra210/xusb.bin from the package to linux-next/extra_firmware/nvidia/tegra210/vic04_ucode.bin and linux-next/extra_firmware/nvidia/tegra210/xusb.bin
- It should be noted that while this may be useful for easy debugging, generated kernel images will be dirty and not strictly GPL compliant. It is recommended that, for image-based releases, that these files be installed to the initramfs.
- TODO: It might be better to just not have an initramfs and have these pulled from the actual root partition, with linux-firmware installed to it.
- Ensure that you have an AArch64 cross-compiler installed.
- export ARCH=arm64
- export CROSS_COMPILE=aarch64-linux-gnu-
- mkdir -p build/hac-001/
- make O=build/hac-001/ hac_defconfig
- make O=build/hac-001/ -j4 Image
- Copy the Image file from build/hac-001/arch/arm64/boot/Image to the boot/ folder on your SD card's FAT partition.
- In this repo, mkimage -A arm -T script -O linux -d u-boot/boot.txt u-boot/boot.scr and copy boot.scr to the boot/directory on the FAT partition of your SD card.
- make O=build/hac-001/ -j4 modules
- make O=build/hac-001/ modules_install INSTALL_MOD_PATH=/path/to/ALARM/rootfs/, you may need to run as root (with environment variables set again).
- ALARM has a default initramfs which needs to be wrapped for u-boot. mkimage -T ramdisk -C gzip -d /path/to/initramfs-linux.img /path/to/FAT/boot/initramfs.uImage
- In the repo, cd device-tree && sh build.sh && cp tegra210-hac-001.dtb /path/to/FAT/boot/
- Your FAT boot/ directory should have Image, initramfs.uImage, and tegra210-hac-001.dtb
- Boot through u-boot. If an error has occurred, it will open a USB mass storage device for the SD card.